Appearance
Tips & Strategy
You can already clear the Target score and you've toppled the Monolith a few times. Now you want the big numbers — the ones that climb the leaderboards. This page is the high-score playbook: stacking Mods, committing to one Augment, spending Coins well, and reading the run so you never get caught short on time or hearts. Every Mod and number below is pulled straight from the build 1.0.1 game data.
Quick facts — top tips at a glance
- Scoring pipeline: Base 10 → ADD (Red) → MULTIPLY (Blue) → Combo. Carry both ADDs and MULTIPLYs.
- Slot order does NOT change ADD/MULT math. The game always computes (10 + all ADDs) × (1x + all MULTIPLYs) × Combo no matter which slot a plain Mod sits in. Dragging only matters for slot-interaction Mods.
- Commit to one Augment early and let the Shop feed it — a focused build beats a scattered one.
- Protect your Combo. One panicked miss resets it. Combo Saver gives Combo Saves per Wave.
- Reload in the lulls, not mid-swarm — "Point Tool down to reload."
- Hearts are a resource: start with 3; a failed Wave costs 1 heart but grants +10 seconds.
- Shoot Glitches first (Coins/Score/Time/Token/Heart) — but never the Bomb Glitch.
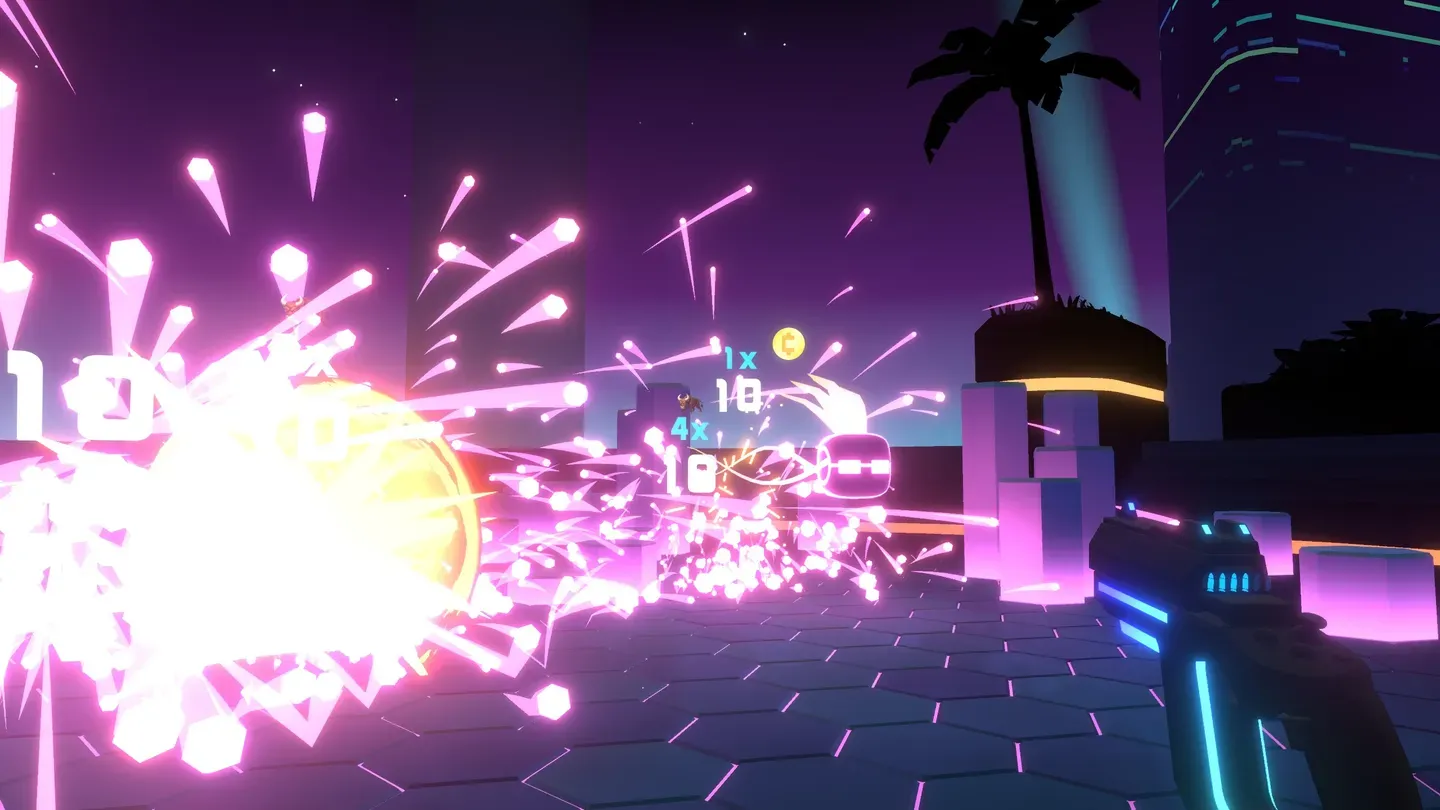 Read the popups. The floating "10", the "1x"/"4x" multipliers, and the Coins dropping are your build talking back to you — they tell you exactly what's working.
The one rule that decides your score
Every Target is worth 10 points. From there, your score for that Target resolves in a strict, game-fixed order:
Base (10) → ADD (Red Mods) → MULTIPLY (Blue Mods) → Combo
In the game's own words on the Scoring screen: "Targets are worth 10 points. Red Mods ADD to this. Then, Blue Mods increase your base 1x MULTIPLIER. Use them both to get high scores." On top of that, a Critical Hit doubles a Target's total value (base crit chance is 20% — more on that under Critical Scope below).
That pipeline is why a balanced build beats raw quantity. Every point of ADD is multiplied, so a +10 ADD under a 6x multiplier is worth 60 — but that same +10 is nearly wasted if you have no multipliers to magnify it (and a huge multiplier does nothing with a tiny base). You want a fat ADD base and the multipliers and the Combo, because each one makes the others worth more. See Scoring, Combos & High Scores for the full math — the strategic takeaways live here.
Tip: For each Mod, ask: does it grow my base, multiply it, or protect my Combo? A great build does all three. A pile of ADDs with nothing to multiply them is wasted potential — and so is the reverse.
Scoring optimization: build the pipeline, then ride the Combo
Two words before the tables. Most Mods are tiered (Tier I/II/III) — you re-buy the same Mod to raise its level and its value keeps scaling. A handful of flagship Mods (marked UNIQUE below) are single-level: powerful, but you own exactly one and can't re-buy to level them. And many Mods are Tool-restricted — the Tool column tells you which Tool can roll each one.
1. Pile on ADD first
Your Red (ADD) Mods build the base number that everything else multiplies. Early in a run, a fistful of cheap ADD Mods out-scores a single flashy multiplier, because there's nothing big to multiply yet. Get the base up first.
| Mod (real name) | Tool | What it does |
|---|---|---|
 Trusty Cog Trusty Cog | All | Adds +3 to Targets — the bread-and-butter ADD, and re-buyable to keep leveling |
 Big Ten (UNIQUE) Big Ten (UNIQUE) | All | Adds +10 to Targets — a huge one-time ADD (single level, can't re-buy to level) |
 Marksman Marksman | Pistol | Adds +20 if you hit with every round in a mag |
 Checks (UNIQUE) Checks (UNIQUE) | All | Adds + per level of all your owned Mods — scales with your whole build |
2. Then layer on MULTIPLY
Once your base is fat, Blue (MULTIPLY) Mods are where the explosions come from. They all stack together before the Combo touches them.
| Mod (real name) | Tool | What it does |
|---|---|---|
 Wrench Wrench | All | Adds 1x to Targets — the reliable, re-buyable multiplier to level up |
 The Multiplier (UNIQUE) The Multiplier (UNIQUE) | All | Adds 4x to Targets — a big one-time multiplier (single level) |
 Balances (UNIQUE) Balances (UNIQUE) | All | Adds 1x per every 2 levels of all owned Mods — a payoff for going wide |
 Summit Summit | Pistol | Adds 2x to Targets while you're at Max Combo |
 Full Throttle Full Throttle | SMG | Adds 1x for each Target destroyed in the previous second — rewards fast hands |
3. Then ride the Combo
Combo is a third multiplier layered on top. Each consecutive hit increases your multiplier by 1x; a miss resets it. The Combo Augment's default max is 3x, but Combo Mods blow that ceiling wide open. (Most Combo Mods are Pistol/Revolver items — fitting, since Combo is the Pistol's built-in Augment.)
| Mod (real name) | Tool | What it does |
|---|---|---|
 To The Moon To The Moon | Pistol / Revolver | Increases your max Combo by 4x |
 Magic Beans (UNIQUE) Magic Beans (UNIQUE) | Pistol / Revolver | Increases max Combo, then grows it by 1x every Wave |
 Combo Skipper (UNIQUE) Combo Skipper (UNIQUE) | All | Each hit adds 2x to Combo instead of 1x — climbs the ladder twice as fast |
 Combo Saver Combo Saver | Pistol / Revolver | Gives Combo Saves per Wave so one miss doesn't wipe your streak |
Note — Strong Coffee is a permanent, not a Shop Mod. Strong Coffee ("start each Wave already at Max Combo") is a fantastic Combo enabler, but it's a permanent (a run reward you pick up on a Permanent node), not a leveled Shop Mod you buy. Same goes for Charged Spring (reload-into-Combo). Treat permanents as bonus accelerants you grab when offered, not Shop staples to plan around.
Tip: Combo is fragile. The single biggest reason a great build under-scores is a panicked miss that resets a 12x Combo to nothing. Combo Saver is cheap insurance — grab one and shoot with confidence.
Dragging Mods: what actually matters
Here's a myth worth busting. You can drag your Mods to rearrange them, but for ordinary ADD and MULTIPLY Mods this doesn't change your score — the game always computes (10 + all your ADDs) × (1x + all your MULTIPLYs), whatever slot each Mod is in. So ignore any "put reds before blues" advice; it makes no difference.
Dragging does matter for the special slot-interaction Mods:
 Level Override copies a neighbour's level into the slot beside it ("Copies the left mod level to the right," and a mirrored version copies right-to-left), and
  Overcharge adds a level to a neighbour then destroys it after the Wave — place these beside the Mod you want boosted. (Don't confuse Level Override with the similarly named "Level Upper," a different Mod that pays Coins to add a level to a neighbouring slot.)
 Lone Gunman adds
 +2to Targets for each Mod slot left empty — so mind where you leave gaps.
Tip: After shopping, don't bother sorting reds and blues. Do check that your slot-neighbour Mods are sitting next to whatever you want them to pump.
Pick a focused Augment early, then build around it
Augments are playstyle definers — you'll usually have one anchoring your run, and they stack if you pick up more. The mistake is treating them as "nice bonuses." The winning move is to commit early and let the Shop feed that one engine. A focused Augment build out-scores a scattered "little bit of everything" build almost every time, because your Mods compound instead of competing.
There are seven Augments. Here's a build direction for each, using real item names from the game data. Most entries below are Shop Mods you buy and level; a few are flagged as (permanent) — run rewards you collect, not Shop Mods.
| Augment | Icon | The idea | Items to chase (real names + effects) |
|---|---|---|---|
| Detonator (Exploding) |  | Targets explode when hit — turn one shot into a crowd hit | Dominos (exploded Targets also explode), Mortar (+ per extra Target hit by an explosion; Pistol/Revolver), Collateral Damage (Targets score + when hit by explosions), TNT (explosion radius up) |
| Arc Module (Lightning) |  | Hits zap a nearby Target — chain the arena | Chain Lightning (+1 more jump), Harness Power (+ score for each jump), Voltage Amp (jump any distance), plus the permanent Fork Lightning (arc to two Targets) |
| Combo |  | Push the multiplier ceiling sky-high and never drop it | To The Moon (max Combo +4x), Combo Skipper (2x per hit instead of 1x), Combo Saver (Combo Saves/Wave), plus the permanent Strong Coffee (start at Max Combo) |
| Arctic Pod (Freeze) |  | Freeze clusters, then cash in frozen Targets for big multipliers | Chiller (x to frozen Targets), Ice Sculpture (+ per other Target currently frozen), Icepick (loads a round when a frozen Target is hit directly), Frozen Treasure (% chance of a Coin when a frozen Target is hit) |
| Critical Scope (Critical Hit) |  | The Augment gives every Target a 20% chance to double its total score — stack crit chance to make it routine | Calipers (+% crit chance), Whetstone (+% crit chance, grows every Wave), Coup de Grace (last round in mag is a guaranteed crit), Torsion Spring (instant reload on a crit), plus the permanent Loaded Dice (+% crit per mag slot) |
| Overkill |  | Each extra hit on a Target adds multiplier — dump rounds into chunky Targets | Boxing Gloves (x when a Target is destroyed with 3+ hits), Speed Bag (load a shell when a Target dies to 3+ hits), Chisel (each extra hit gives +% chance of a Coin) |
| Heat |  | Each Heat level adds to your Multiplier — keep firing to keep it maxed | Time Out (Heat doesn't decrease while reloading; SMG), Beanie (Heat fades slower; SMG), Crucible (per Heat level, +% chance of a Coin on a kill; SMG), plus the permanent Firestarter (start the Wave with extra Heat) |
Tip: When an Augment node appears on the path, ask "does this make my run more of what it already is?" If you have no engine yet, take the Augment that fits your Tool and Mods so far. If you already have a roaring Exploding or Combo build, a second unrelated Augment often does less than another Mod that feeds the first — though since Augments stack, a complementary second one can be worth it.
Managing Coins: buy, refresh, or sell?
Coins are your run's fuel. Between Waves you visit the Shop, and every Coin spent well is score you'll bank later. Three levers to pull:
- Buy the Mod that feeds your engine, and re-buy the same tiered Mod to raise its level. Leveling an existing Tier I/II/III Mod is often a better deal than a brand-new one — it deepens your build instead of widening it. (UNIQUE Mods like Big Ten, The Multiplier, Checks, Balances, Combo Skipper and Magic Beans are single-level — you can't re-buy them to level up, so prioritize tiered Mods when you want to scale.) Mod levels can even climb past the usual cap of 5 via Sockets (Super / Mega / Ultra Socket add
+1/+2/+3levels to a random Socket) and Hacks, and the values keep scaling. - Refresh when nothing in the Shop fits your plan. Refreshing rerolls the offerings; the cost climbs each time, so don't refresh-spam. The permanent
 Deep Search ("Refreshing the Shop starts at 0") makes hunting for that one key Mod painless if you find it.
 - Sell Mods you've outgrown — a dead early-game ADD can become Coins for a key MULTIPLY. The best moments to cash out are the next-Shop bonus windows:
 Bull Market (sell Mods for 3x value in the next Shop), and the permanent
  Miracle Wax (all Mods sell for double value). Chaotic Bargain is a related randomized sell-value reward.
Tip: Watch for the discount rewards —  Sale! (
20% off),  Bargain! (
30% off), and  Stocktake Madness! (
40% off), each applied to all Mods in the next Shop. If a discount lands right before a Shop full of Blue MULTIPLY Mods, that's the trip to spend big on. And the permanent  Buffet adds an extra option in the Shop, widening your odds of finding exactly what you want.
For the deeper economy breakdown, see Mods.
Risk vs reward: Elite and Curse nodes
The path up the Monolith branches, and two node types pay extra Coins for extra danger:
| Node | Icon | The deal (in-game text) |
|---|---|---|
| Elite |  | "Harder, but more coins." A tougher Wave with a fatter Coin payout. |
| Curse |  | "Curse, but more coins." You take a run-altering downside in exchange for Coins. |
When to take them: Early, when your build is hungry for Coins and the extra danger is manageable, Elite and Curse nodes accelerate you hard — more Coins now means a stronger engine for the rest of the run. When to skip: Late, with a glass-cannon build and one heart left, the extra difficulty (or a nasty Curse) can end a record run. Read the Curse before you commit — some are mild taxes, others gut your Shop or strip a mechanic.
Tip: Curses that punish a mechanic you don't use are nearly free Coins. For example, Heatwave ("You can no longer freeze items in the Shop") is painless if you're running a Combo build — take the Coins and move on.
Prioritize Glitches: the in-run loot drops
Mid-Wave you'll see special Glitches pop in — colorful Targets that drop a bonus when you destroy them. Shooting these first is one of the highest-value habits you can build, because a single Glitch can swing your whole run.
| Glitch drop | Why you want it | Priority |
|---|---|---|
 Heart Heart | An extra life — your survival lifeline | Top priority when low on hearts |
 Coins Coins | Free run fuel toward your next Mod | High — economy |
 Token Token | Refresh/reward currency | High — economy |
 Score Score | Direct points | High when chasing the target score |
 Time Time | Extra seconds on the clock | High when the timer's tight |
 Bomb Bomb | A penalty — avoid hitting it | Do not shoot |
(Silhouettes above are reference icons; in-game these are neon 3D Targets.)
Tip: Learn the Bomb Glitch's look cold so your reflexes never tag it by accident. Then lean into Glitches with the right items. The Shop Mod  Glitch Glut ("extra Glitches spawn each Wave") adds Glitches you can buy and level, while several permanents supercharge them: Glitch Injector ("Spawn 1 more Glitch each Wave"), Glitch Hunter ("Glitch rewards are worth double"), and Glitchy Timer ("Glitches last twice as long"). A Glitch-focused economy can snowball your Coins faster than any single Coin Mod. See Targets for the full roster.
Reload discipline: point down early
Point Tool down to reload.
That's the whole control — aim your Tool at the floor and it reloads. The skill is timing. New players reload only when they're already empty, mid-panic, and watch their Combo and clock bleed out. Better players reload proactively, in the gaps between Target clusters, so they're always topped up when the action spikes.
- Reload in lulls, not crises. A reload during a quiet beat costs nothing; the same reload mid-swarm costs Combo, time, and points.
- Mind your magazine size. A bigger mag (the Shop Mod
 Big Stack, which adds rounds to your mag) means fewer reloads and longer Combo runs. Faster reloads shrink the dead time — the Shop Mod
  Machine Oil (
% shorter reload), and the permanent Dynamo ("Reloading is 50% faster"). - Turn reloads into offense. Some items reward reloading:
 Baked Beans (Shotgun/Revolver/Grenade) adds a multiplier to the first shot after fully loading an empty mag,
  Chili Pepper makes Targets worth more each time you fully reload an empty mag (resets each Wave), and the permanent Charged Spring increases your Combo by
 2xon reload (if not already at max). With those, a well-timed reload is offense, not downtime.
Tip: If your build resets Combo on reload — Reckless Climber (Pistol/Revolver) does exactly that ("Reloading resets your Combo") in exchange for +3x extra whenever your Combo increases — be deliberate: empty the mag fully, reload once, and rebuild. Don't trickle-reload and bleed your streak.
The timer and the heart safety net
Each round is a tight window to hit the Target score. Two things to internalize:
- Failing a Wave isn't game over — it's a trade. Miss the score and you lose a heart but gain +10 seconds (the game's exact wording: "Failed? Lose a ❤ and gain +10 secs"). You start each run with 3 hearts. A tough Wave is survivable — you can essentially "buy" more time with a heart.
- Spend that trade wisely. Burning a heart to clear an early Wave is fine if it sets up a stronger build. Burning your last heart late is a run-ender. Watch your heart count like a second timer.
Top up hearts when you can: the Heart Glitch drops a life mid-Wave, and the Extra Life reward ("Add an extra life") pads your pool. A spare heart late in a run is the difference between cashing out a record and watching it evaporate.
Tip: When the clock is low and you're close, don't tunnel on a single tricky Target — sweep the easy ones to bank guaranteed points (and a possible Time Glitch). Banked points beat a heroic miss.
Pushing the leaderboards
Leaderboards split by Tool and difficulty, plus the separate Endless board, so you're competing on the same footing — pick a lane and grind it.
- Specialize. A leaderboard run rewards mastery of one Tool + Augment combo over dabbling. Learn one engine until it's automatic.
- Climb the difficulty ladder. Higher difficulties post bigger numbers. Once a run feels comfortable, step up.
- Protect the snowball. A record run is one that never breaks its Combo and never wastes a Shop. Combo Saves, proactive reloads, and a focused build are what separate a good run from a great one.
- Go Endless for the big numbers. Endless Mode continues past the Monolith with its own leaderboard and fast-rising score targets — the stage for true score-attack runs. (Make sure you're online and on the latest version, or scores won't post.) See Modes.
Tip: Watch your own runs. After a great one, note which decision built the explosion — the Augment you committed to, the Shop where you went all-in, the Glitch chain you cashed. Repeat that decision deliberately next time. Hyper Bullet runs are short on purpose; the cost of trying a sharper line again is tiny.
Quick-reference cheat sheet
- Pipeline: Base 10 → ADD → MULTIPLY → Combo (fixed by the game — slot order of plain Mods doesn't change it), then ×2 on a Critical Hit. Carry ADDs and MULTIPLYs.
- Build: Commit to one Augment early; let the Shop feed it. Augments stack.
- Coins: Re-buy tiered Mods to level your engine (UNIQUE Mods are single-level); refresh only when nothing fits; sell dead Mods on a Bull Market (3x) or Miracle Wax (2x, permanent) window. Sockets/Hacks push levels past 5.
- Risk nodes: Take Elite/Curse early for Coins; skip them late on low hearts. Free Coins if the Curse hits a mechanic you don't use.
- Glitches: Heart for survival, Coins/Token/Score/Time for value, never the Bomb.
- Reload: Point down in the lulls, not the panic.
- Hearts: Fail =
-1 heart, +10s. You have 3. Bank a spare for late Waves. - Leaderboards: Specialize, climb difficulty, protect the snowball, go Endless.
See also
- Scoring, Combos & High Scores — the full point math
- Mods — every Mod and how the Shop works
- Augments — deep dive on all seven playstyles
- Targets — the Glitch roster and what each drop does
- The Monolith — node types and routing the climb
- Curses — the run-altering downsides
- Tools — Pistol, SMG, Shotgun and their pre-installed mechanics
- Modes — difficulties, Endless, and the leaderboards