Appearance
Scoring, Combos & High Scores
Hyper Bullet is a score-attack game at heart. You're not just clearing Targets — you're chasing the biggest number you can possibly post before the timer runs out. The good news? The scoring rules are simple to learn. The great news? Once you understand the order they fire in, you can turn a humble 10-point Target into a screen-filling explosion of points.
Quick facts
- Base value: Every Target is worth 10 points (a handful of bonus/boss Targets differ).
- The formula:
(10 + all ADDs) × (1x + all MULTIPLYs) × your Combo, then ×2 on a Critical Hit. - Starting multiplier: 1x — Blue (MULTIPLY) Mods push it up from there.
- Order is automatic: ADDs always resolve before MULTIPLYs no matter where the Mods sit in your loadout.
- Three score mechanics: Combo (clean streaks), Overkill (extra hits), Heat (relentless fire) — each is pre-installed on certain Tools.
- Round goal: Reach the Target score within 30 seconds, or lose a heart and gain +10 seconds.
- Submitted stat: Your Total Score, ranked per Tool on Global and Friends boards (plus a separate Endless board).
This page breaks down exactly how points are made, how your Combo snowballs, what Overkill, Heat and Critical Hits do for your score, and how to build a run that lands you on the leaderboards.
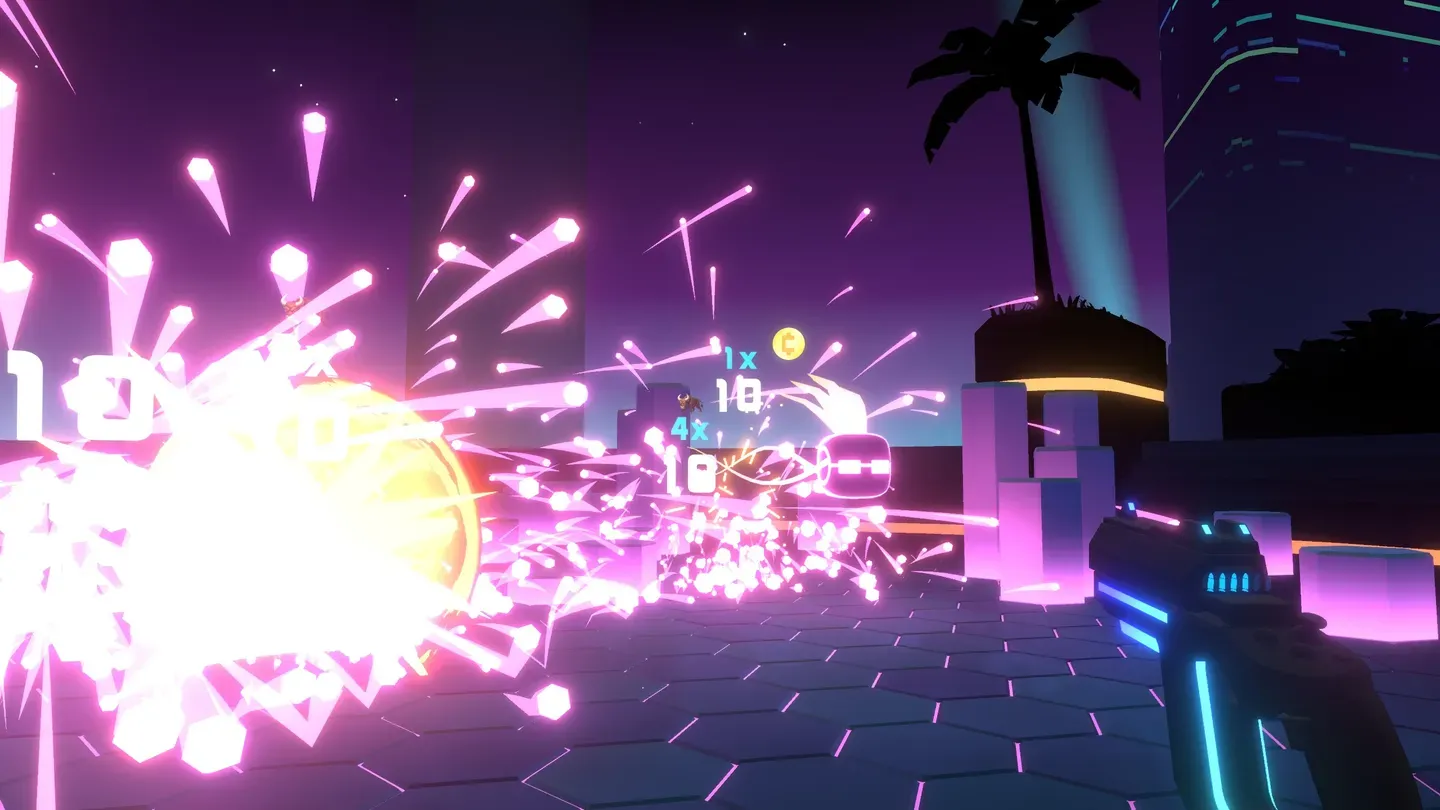 Every Target you process throws up its own score popup — base points, your multiplier, and any Coins it drops. Read those numbers; they tell you exactly what your build is doing.
The golden rule: 10 points, then ADD, then MULTIPLY, then Combo
Straight from the game's own How to Play screen:
Targets are worth 10 points.Red Mods ADD to this.Then, Blue Mods increase your base 1x MULTIPLIER.Use them both to get high scores.
Here's the full pipeline for a single Target, in the exact order it resolves:
| Step | What happens | Driven by |
|---|---|---|
| 1. Base | Every Target starts at 10 points | The game |
| 2. ADD | Red (ADD) Mods stack on top of the base |  Red Mods Red Mods |
| 3. MULTIPLY | Blue (MULTIPLY) Mods raise your 1x multiplier | Blue Mods |
| 4. COMBO | Your live Combo multiplies the result again | Your streak |
| 5. CRIT | A Critical Hit doubles the whole total (×2) | Random chance |
So the formula players use is:
(10 + all ADDs) × (1x + all MULTIPLYs) × your Combo = points for that Target…and then ×2 on a Critical Hit.
Your multiplier starts at 1x. Blue Mods push it up from there. Then, on top of that, your Combo multiplies everything one more time, and a lucky Critical Hit doubles the final number. ADDs and MULTs are permanent parts of your build; your Combo is the live, in-the-moment streak you build with your trigger finger.
A worked example (straight from the tutorial)
The in-game tutorial walks you through this with real numbers:
- A Target is worth 10.
- You pick up a Red Mod that adds +3 → the Target is now worth 13.
- You pick up a Blue Mod that adds 1x → your multiplier goes from 1x to 2x.
- 13 × 2x = 26 points.
Now stack a Combo on top. If you're riding a 4x Combo when you process that Target, it's 26 × 4 = 104 points from a single shot — and if that shot rolls a Critical Hit, double it again to 208. That's the snowball the game is built around — small decisions snowball into massive score explosions.
Tip — stack both: ADDs are always multiplied, so a fat pile of Red Mods makes every Blue Mod (and every Combo point) worth dramatically more. The catch new players miss is the opposite of what you'd expect: this is automatic — the result is the same wherever the plain ADD/MULTIPLY Mods sit, so you do not need to drag ADDs in front of MULTIPLYs. Just make sure your build carries a healthy stack of both. (Dragging only changes the outcome for Mods that boost their neighbours or read empty slots — see Mods.)
Critical Hits: a free ×2
Every shot has a chance to Critical Hit, doubling that Target's total score value — base, ADDs, MULTIPLYs and Combo all included. The default chance is 20%:
Critical Scope — Targets have a 20% chance of doubling their total score value.
That 20% is the game's baseline Critical Hit chance, so on average one shot in five quietly doubles. A few Mods raise the odds further:
| Mod | Effect |
|---|---|
| Loaded Dice | Increases Critical Hit chance by 2% for each slot in your magazine |
| Coup de Grace | The last cartridge in your magazine has +100% Critical Hit chance (a guaranteed crit) |
| Glitch Guarantee | Hits on Glitches have +100% Critical Hit chance |
Tip: Critical Hits multiply the whole number, so they pay off most when the rest of your stack is already huge. A crit on a maxed-Combo, fully-stacked shot is exactly the kind of moment that sets a new Best Shot.
Combos: your live multiplier
Your Combo is a multiplier that climbs while you play well and collapses when you slip. It's the single biggest swing in your per-Target score, because it stacks on top of everything your build already does.
The classic Combo behavior (the Combo Augment) works like this:
Each consecutive hit increases your multiplier by 1x. Misses reset your combo. Default max combo is 3x.
Building it, keeping it, losing it
- Building — land hits. Each clean, consecutive hit bumps your Combo up by 1x toward its max. The faster and cleaner you shoot, the faster it climbs.
- Keeping it — stay accurate and keep firing. As long as you keep connecting, your Combo holds at the top.
- Losing it — a miss resets your combo back to the bottom. You'll see a shrinking ring and a down-arrow pop where you lost it, showing how much multiplier just evaporated. Reloading at the wrong moment can also cost you with certain Mods (read each Mod's text).
Tip: A miss at high Combo is the most expensive mistake in the game — you're not just losing one shot, you're resetting the multiplier on every Target after it. When in doubt, take the clean shot over the greedy one.
Not every Tool counts Combo the same way
Under the hood the game has three combo-tracking styles, and which one your Tool uses changes what "consecutive" means:
- Consecutive hits — the classic style described above: every clean hit adds to your Combo, a miss resets it.
- Speed hits — your Combo reflects how fast you're landing hits, so it rewards a rapid hit cadence rather than a flawless streak.
- Speed shots — your Combo reflects how fast you're firing, rewarding raw output.
The exact style is set per Tool/Augment, so if your Combo behaves a little differently than another Tool's, this is why.
Combo is pre-installed on certain Tools
You don't always have to buy into Combo — it's pre-installed on specific Tools. The Pistol, for example, ships with the Combo Augment by default. Check your Tool's loadout: if it ships with Combo, you start every run already in the score-snowball business. The same is true for Overkill and Heat (below) — each is baked into certain Tools by default. Tools without it can still grab the Combo Augment from an Augment node.
Combo Saves — your safety net
A Combo Save absorbs a single break so one stray miss doesn't reset your streak. The leveled Combo Saver Mod refills them every Wave, while Combo Stash / Haul / Hoard are one-time consumable pickups (not shop Mods you level up) that top up your save count on the spot — you grab these on the post-Wave Round Reward screen:
| Source | Type | What it does |
|---|---|---|
 Combo Saver Combo Saver | Utility shop Mod | Gives 1 Combo Save per Wave (more per level) |
 Combo Stash Combo Stash | Consumable | Adds 3 Combo Saves |
 Combo Haul Combo Haul | Consumable | Adds 5 Combo Saves |
 Combo Hoard Combo Hoard | Consumable | Adds 10 Combo Saves |
Mods that push your Combo higher
The Combo ceiling isn't fixed — you can raise it, start at it, and climb faster:
| Mod | Effect |
|---|---|
 To The Moon To The Moon | Increases your max Combo by 4x (more per level) |
 Combo Buoy Combo Buoy | Raises your minimum Combo by 2x (can't exceed max), so resets hurt less |
 Summit Summit | Adds 2x to Targets while you're at Max Combo (more per level) |
 Combo Skipper Combo Skipper | Each hit adds 2x to Combo instead of 1x — climb twice as fast |
 Magic Beans Magic Beans | Increases max Combo by 1x, then grows it by a further 1x every Wave |
Strong Coffee  is a closely related item — it makes you start each Wave at Max Combo — but note it's a permanent run item, not a leveled shop Mod (see Augments & Permanents).
Tip — the dream pairing: Strong Coffee (start at max) plus Combo Buoy (high minimum) means you spend almost the entire Wave at a sky-high multiplier, even if you fumble a shot. That's a foundation a high-score run is built on.
A note on feel: the slow-mo on kills and misses
You may notice time itself flexing as you play: the game subtly speeds up for a beat each time you destroy a Target (an "impulse") and dips into slow-mo on a miss (a "depulse"), with the size of the effect tuned to your Tool's fire rate. It's a bullet-time-style feedback layer — pure game-feel that makes a clean streak feel fast and a fumble feel heavy. It's juice, not a stat: there's nothing to build for or optimize here, so just enjoy the rhythm it gives your run.
Overkill: every extra hit is more points
Overkill rewards you for pouring extra hits into a Target before it bursts:
Adds 1x for every additional hit on a target.
In other words, a Target that dies in one hit scores normally, but a Target you tag 3–4 times before it pops scores way more. This makes Overkill a natural fit for fast-firing Tools like the SMG and the spread of the Shotgun, where landing extra hits is easy. Overkill is pre-installed on specific Tools.
Mods that lean into Overkill:
| Mod | Effect |
|---|---|
 Boxing Gloves Boxing Gloves | Adds 2x when a Target is destroyed with 3+ hits |
 Chisel Chisel | Each additional hit on a Target gives a +4% chance (per level) of a bonus Coin |
 Speed Bag Speed Bag | Loads a shell when a Target is destroyed with 3+ hits — keeps you firing |
Tip: Overkill turns "wasted" bullets into score. Don't feel bad about dumping a few extra rounds into a juicy Target — with an Overkill build, that's the whole point.
Heat: keep the barrel glowing
Heat turns aggression itself into a multiplier:
Firing and hitting targets increases your Heat, which slowly fades away. Each level of Heat adds to your Multiplier.
So the more relentlessly you fire and connect, the hotter you run, and the higher your multiplier climbs. Stop shooting and your Heat cools off, dragging your multiplier back down. It rewards a completely different rhythm from Combo — instead of clean accuracy, Heat wants constant output. Heat is pre-installed on specific Tools (the SMG ships with it).
Mods that feed the fire:
| Mod | Effect |
|---|---|
 Firestarter Firestarter | Start each Wave with 5 Heat already banked |
 Beanie Beanie | Heat fades slower (a further step slower per level), so your multiplier holds |
 Time Out Time Out | Heat does not decrease while you reload |
 Blow Torch Blow Torch | Heat gained is increased by 50% |
 Crucible Crucible | For each level of Heat, +1% chance (per level) of a Coin when destroying a Target |
Tip: Heat and reloading are natural enemies — every second spent reloading is Heat cooling off. Pair Heat with Time Out ("Heat doesn't decrease while reloading"), or use a Tool with a big magazine, to keep the meter pinned high.
How the three mechanics feed your multiplier
Combo, Overkill and Heat aren't just flavor — each Tool quietly runs a built-in scoring Mod that converts the mechanic into multiplier. The Combo, Heat and Overkill built-ins each contribute a +1x multiplier step (scaling with their level), which is why a maxed Combo, a roaring Heat bar, or a heavily-overkilled Target all read as a bigger MULTIPLY total in the formula above. You don't manage these directly — they come with the Tool — but they're the bridge between "playing the mechanic well" and "the number going up."
The round Target and the timer
Each node up the Monolith is a 30-second round with a Target score you have to beat:
Reach the Target score before time runs out.
- Hit the Target score in time and you clear the Wave and move on.
- Run out of time short of it and you fail the round: lose a heart and gain +10 seconds to try again. Lose all your hearts and the run ends.
The on-screen readout shows two numbers: your live Score and the Target you're chasing. Higher Waves and harder difficulties raise the Target sharply — the game sizes each Wave's Target from your difficulty specs (a base score, a "super ramp" Wave after which the requirement climbs fast, a boss bump and a per-difficulty score bonus). The takeaway: your build needs to scale. A setup that crushes Wave 3's Target will get left behind by Wave 12 unless your ADDs, MULTs, and Combo have all been growing too.
Tip: The Target score is the floor, not the goal. Clearing it keeps you alive; blowing past it is what posts a leaderboard run. Once you've secured the round, keep processing Targets to pad your Total Score until the clock hits zero.
End of run: your scorecard
When a run ends, the game tallies up how you did. These are the numbers that define the run:
| Stat | What it means |
|---|---|
| Total Score | Your full run score — every point from every Wave added up. This is what gets submitted to the leaderboards. |
| Best Score | Your best Total Score on this Tool — the number to beat. |
| Best Combo | The highest Combo multiplier you reached during the run. |
| Best Shot | The single most valuable shot you landed all run — one Target (or one spread) that scored huge. |
Best Shot is the bragging-rights stat: it's the moment all your ADDs, MULTs, a maxed Combo and (ideally) a Critical Hit lined up on one perfect trigger pull. Chasing a new Best Shot is its own mini-game — find a packed cluster of Targets, get your Combo maxed, and let a fully-stacked Shotgun blast eat the whole group at once.
Leaderboards: where your score lives

Post a run and your Total Score goes up against the world. You can view two scopes of the same board:
- Global — everyone, everywhere.
- Friends — just the people you know, for a friendlier rivalry.
Leaderboards are split per Tool (and a separate Endless board — see below). The game keeps just two board IDs internally — a standard combined board and an Endless one — and attaches your difficulty, Mods, Permanents and skin as metadata on each posted score rather than running a wholly separate board per difficulty. So when you compare runs, you're comparing them on the same Tool's board, with difficulty recorded alongside each entry. Want a top spot? Pick a Tool, learn it, and grind it.
Note: If you're offline, or not on the latest version of the game, your scores won't be posted to the leaderboards — so update and reconnect before a serious run.
The Endless leaderboard
Endless Mode (a paid unlock) keeps the run going after you've defeated the Monolith, with its own separate leaderboard:
Continue processing after Monoliths are destroyed. Allows you to submit scores to the Endless leaderboard. Score targets increase quickly after the Monolith is destroyed.
Endless is the ultimate score-attack arena — the Target scores ramp up fast (the same difficulty-spec scaling, pushed hard past the Monolith), so only the most explosive builds survive deep. If you don't have Endless unlocked, you can still post to the standard boards; you just can't submit Endless runs.
Note: The leaderboards may be reset for major balance changes, so a fresh board is always a chance to climb back to the top.
High-score strategy: stack ADDs, then MULTs, then ride the Combo
Everything above points to one winning recipe. Here's how to put it together:
- Build your base with Red (ADD) Mods first. Because your ADDs are baked into the base before it gets multiplied, a tall stack of
+pointsmakes every multiplier you own worth more. Early in a run, prioritize cheap ADDs to set a high floor. Grab the big ones like Big Ten (
(+10) when you can. - Then pile on Blue (MULTIPLY) Mods. Once your ADD base is fat, Blue Mods like The Multiplier
 (
(+4x) and Wrench (
(+1x) multiply that whole pile. This is where scores start jumping by hundreds. - Carry a healthy stack of both. The
(base + ADDs) × (1x + MULTIPLYs)math is worked out automatically, so you don't need to drag reds in front of blues — placement of plain ADD/MULTIPLY Mods doesn't change your score. What matters is having lots of ADDs and the multipliers to magnify them. (Position only matters for Mods that boost a neighbour or read empty slots — see Mods.) - Keep your Combo maxed. A maxed Combo can be the difference between a good run and a record. Invest in raising your max Combo, starting at max (Strong Coffee), and Combo Saves so one miss doesn't undo it. Remember Mod levels can climb past the usual cap via Super Sockets, Hacks, and buff Permanents — those values keep scaling.
- Pick a mechanic and commit. Combo, Overkill, and Heat each reward a different style — clean streaks, extra hits, or relentless fire. Lean into whichever one your Tool was built for and feed it with matching Mods rather than spreading yourself thin.
- Don't stop at the Target. Clearing the round Target keeps you alive; the extra seconds you spend processing Targets afterward are pure leaderboard fuel.
Note on Big Ten: Big Ten is a Unique single-level Mod — its base is
+10and it does not level up to a higher value through normal purchases. Like any Mod, it can scale beyond+10via Super Sockets, Hacks, or an ADD-buffing Permanent, but there's no+50you reach just by buying it again.
The mantra: Set a high floor with ADDs, multiply it with MULTs, ride your Combo, and let the occasional Critical Hit double it all. Small decisions, massive score explosions.
See also
- Mods — every Red (ADD), Blue (MULTIPLY), Utility, Coin, Unique and Rainbow Mod, and how to arrange them.
- Augments — Combo, Overkill, Heat, Critical Scope and the other playstyle-defining Augments (plus Permanents like Strong Coffee).
- Tools — which Tool ships with Combo, Overkill, or Heat pre-installed, and how their fire styles change your scoring.
- The Monolith — the 15-Wave run, node types, difficulties and Endless Mode.
- Round Rewards — the post-Wave reward screen, including the Combo Save consumables above.
- Targets — Target values, HP, and the Glitches that drop Coins and bonuses.
- Tips & Strategy — putting a full high-score run together.